How To: Add a New Cloak Texture
By: The Amethyst Dragon
Based on Original By: by Brian Chung (with help from Lisa) [source]
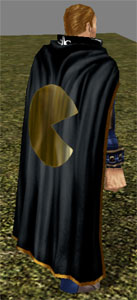
Neverwinter Nights has support for dynamic cloaks. Equip a cloak into the cloak slot, a cloak appears on your character. These are skinmeshed and were animated by Adam "ragnarok_mr4" Anden of DLA so they deform with the PC, and do not stick out as a neck body part replacement.
The cloak system is implemented differently than other game objects to easily allow custom content creators to add their own designs. Content creators have the ability to mix'n'match the model with a PLT texture based on a 2DA entry, so you don't need to do any editing in 3D Studio Max or text edit the .MDL file to replace the texture.
This tutorial goes through the steps needed to add a new cloak texture to the game. Please note: How to use Photoshop or GIMP is beyond the scope of this tutorial.
Quick Jump:
Step 1: Acquire Base PLT Texture
Step 2: Convert PLT to PSD
Step 3: Make New Design
Step 4: Export PSD to PLT
Step 5: Make An Inventory Icon
Step 6: Modify the 2DA
Step 7: Create a Hak File
Step 1: Acquire Base PLT Texture
 The first thing that is needed is one of the original cloak textures from the game. It may be a good idea to run through this quick How To: Extract a Game Resource tutorial before this...it will give you access to all the artwork and other resources included with the game. The first thing that is needed is one of the original cloak textures from the game. It may be a good idea to run through this quick How To: Extract a Game Resource tutorial before this...it will give you access to all the artwork and other resources included with the game.
Using NWN Explorer, browse to the NWN: HotU Patch Data -> data/xp2patch.bif -> Textures, PLT section for the cloak PLT you want to modify. Please note, while there are 15 cloak types, there are 7 cloak models, and each one has a different UV layout. Pay attention to which cloak model you want to use it with. While you're at it and have NWE open, grab the "cloakmodel.2da" file too (found in NWN: HotU Patch Data -> data/xp2patch.bif -> Game Data).
For this tutorial, we'll use the "Fancy" cloak. From the cloakmodel.2da file, we see the "Fancy" cloak uses texture 4, so we extract "cloak_004.plt".
- Back to the start...
Step 2: Convert PLT to PSD
Using GIMP with the PLT plugin from Joco, convert the .PLT into a .PSD for easier editing (or you can edit it from GIMP, it's up to you.) You'll end up with a multi-layered grayscale image. To convert, just do a "Save As..." with the file open in GIMP, and select the .PSD file type. This conversion helps to keep the layers in the proper order.
- Back to the start...
Step 3: Make New Design

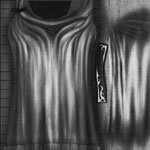
Now, we'll grab the design we want to use for our cloak. Maybe something a little retro.
|
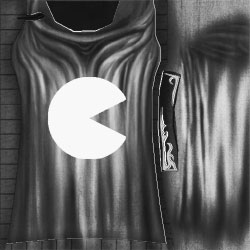
In Photoshop, we'll start off by cutting out our new design and positioning our man on the back of the cloak.
|
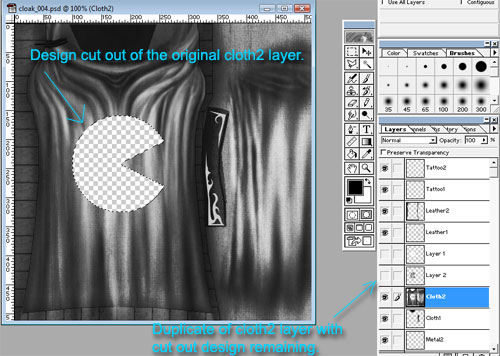
Then we need to cut out Pacman from the Cloth2 layer. Select the overlayed design: do not use anti-aliasing, blurring, or any sort of feathered/wet edges...this leads to ugly black lines on the finished .plt. A good idea is to shrink the marque by 1 pixel to remove any possible "grunge" from the outline (which can come from resizing). Also, make a duplicate of the Cloth2 (in this texture's case) and inverse the selection so it's like you cut the design out of the cloth...we'll need this cutout for later.
|
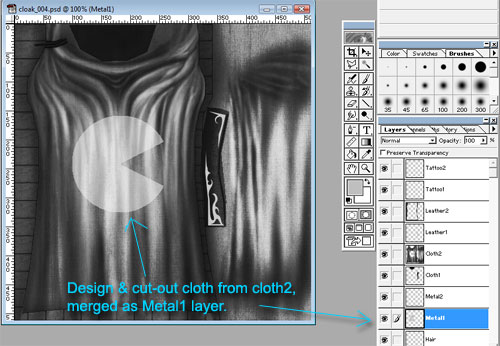
Now, we place our design layer as Metal1. Then we overlay the cloth textured cutout on top of it and set the cloth version to "Multiply" at 50%. This overlay is to retain the wrinkles and shadows in the cloth so the logo doesn't appear as flat. Merge the Metal1 and copy of Cloth2 to the new Metal1 channel.
Note, your own logo can be split into multiple layers and does not have to use the Metal1 layer.
|
- Back to the start...
Step 4: Export PSD to PLT
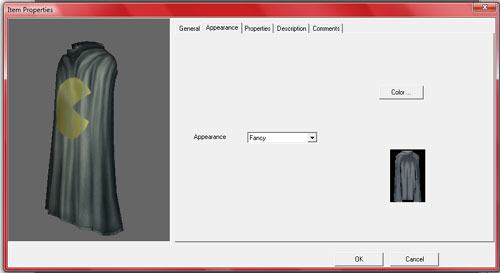 From Photoshop, use the PLT exporter plugin and export your new image (File -> Export -> PLT...) as "cloak_004.plt" and put it into your override folder. Open up a blank test module in the toolset, create a new cloak with the "Fancy" appearance, and test to verify the PLT exported correctly and the channels are working as intended. From Photoshop, use the PLT exporter plugin and export your new image (File -> Export -> PLT...) as "cloak_004.plt" and put it into your override folder. Open up a blank test module in the toolset, create a new cloak with the "Fancy" appearance, and test to verify the PLT exported correctly and the channels are working as intended.
Now would be a good time to grab a toolset screenshot of your cloak showing the new design. We'll use this later for making your inventory icon.
Once you are happy with your new texture, move the .plt out of the override folder to someplace easy to locate, then rename it to the number you plan on using in your hak. For this example, we'll use "cloak_020.plt".
Note from Lisa: "Added note: you can use any 3 digit number (I haven't tested longer or shorter). Your numbers do not have to be in order."
Other Notes:
- Layers for a PLT should be in a certain order. From top to bottom, they are:
- - Tattoo2
- - Tattoo1
- - Leather2
- - Leather1
- - Cloth2
- - Cloth1
- - Metal2
- - Metal1
- - Hair
- - Skin
- The PLT exporter plugin may ask you to save as a specific PSD in a specific location first. If that happens, it's easy enough to just change the file name and location after the export is finished.
- Back to the start...
Step 5: Make An Inventory Icon
You're likely to want a custom inventory icon to go with your new cloak texture. Like other clothing/armor items, this icon will also be a PLT so that the icon will reflect the coloration of the in-game item. This icon needs to be a 64 pixel wide x 128 pixel high image, but only the upper 96 pixels will be used by the game (for a 2x3 space inventory icon).
For this new icon, we'll start by taking our screenshot from the toolset that shows off our new design and cropping it to show just the cloak. We'll then select the background grey color an eliminate it, leaving just the cloak with transparent space around it.
 Time to resize the cloak so that it is 94 pixels high (I like to leave a pixel around the outside just so my icons don't look flattened on any edges). This will likely leave some anti-aliased/partial pixels around the edges, so select the empty space (no anti-aliasing!), expand by 1 pixel, then delete the selection. Just like the cloak texture itself, PLT inventory icons don't play well with partial transparencies of pixels. Time to resize the cloak so that it is 94 pixels high (I like to leave a pixel around the outside just so my icons don't look flattened on any edges). This will likely leave some anti-aliased/partial pixels around the edges, so select the empty space (no anti-aliasing!), expand by 1 pixel, then delete the selection. Just like the cloak texture itself, PLT inventory icons don't play well with partial transparencies of pixels.
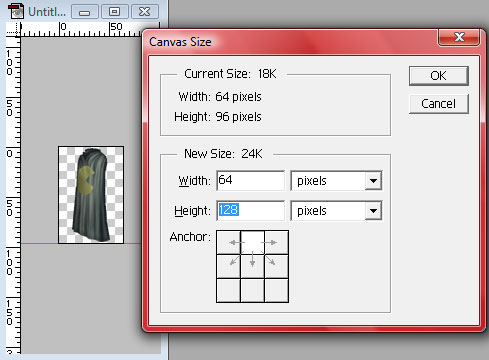
Now that the cloak is on its own, it's time to resize the canvas: First to 64 pixels wide x 96 pixels high (to properly center our new cloak), then again to 64 x 128 pixels (our final size, adding the new space at the bottom).
Now comes the work part. Make 9 copies of your cloak icon as new layers. Rename the layers as they should be for PLT layers, in the correct order (see section above for this info).
For the next step, I like to have the full test cloak texture visible in the toolset, so I can chance colors around to better make the different materials stand out where they belong on the cloak.
 Zoom in on your cloak icon image. For each layer, select (no anti-aliasing!) the parts of the cloak that are not part of that "material" and delete them. For example, the Skin, Hair, Tattoo1, and Tattoo2 materials are not part of the cloak, so we can just delete everything on those layers. If we select our Pacman design, we can delete that from every layer except Metal1 (since that's the layer that has it in the full cloak PLT). Continue onward until each pixel of the small cloak image only shows up on a single layer. When you have all the layers visible, you should still be seeing your entire cloak, surrounded by tranparent space. Zoom in on your cloak icon image. For each layer, select (no anti-aliasing!) the parts of the cloak that are not part of that "material" and delete them. For example, the Skin, Hair, Tattoo1, and Tattoo2 materials are not part of the cloak, so we can just delete everything on those layers. If we select our Pacman design, we can delete that from every layer except Metal1 (since that's the layer that has it in the full cloak PLT). Continue onward until each pixel of the small cloak image only shows up on a single layer. When you have all the layers visible, you should still be seeing your entire cloak, surrounded by tranparent space.
Unlike most PLT textures, the inventory icons do support having fully transparent space. When looking at the entire stack of layers, anything not filled in will be tranparent in the inventory icon.
Be sure to change your image mode to grayscale! Go to Image -> Mode -> Grayscale. Don't merge the layers. If you think your grayscale will be too dark (it should be close to or slightly lighter than the grayscale of the full cloak PLT), you can lighten up your layers before saving/exporting.
Save your work! Then do a File -> Export -> PLT... again, this time for the inventory icon. Go ahead and jump through any hoops the exporter wants from you. :P Once it's exported, you can test it in the override folder, just like you did the full cloak (rename it to "icloak_m_006.plt" (the "fancy" cloak uses icon number 6, even though it's texture number 4), drop in NWN/override, open in toolset, and check icon using the "Fancy" cloak appearance). Once satisfied, move your new icon out of the override to your desired folder, then rename it to match your new cloak PLT, except with a lowercase "i" at the start and an "_m" right after the word cloak. For this example, we'll go with "icloak_m_020.plt".
- Back to the start...
Step 6: Modify the 2DA
Once you have your new cloak texture functional, and the files renamed and stored in an easy to remember spot, it's time to do some 2da editing. Open Notepad (or similar plain text editor), then use that to open cloakmodel.2da (you should just be able to drag/drop it into the editor window).
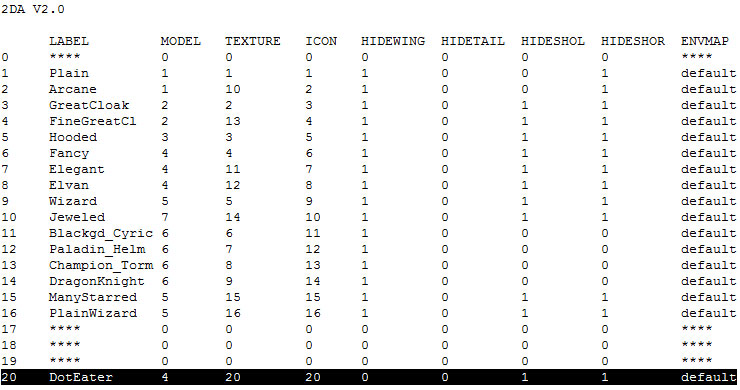
In my version here, I've padded the 2da with lines 17, 18, and 19. I've renamed my texture and icon as number 20, so I'm using line 20 just to keep things easy to remember for myself.
Each column of the 2da has a specific purpose:
LABEL - This is the text displayed in the toolset when selecting the cloak appearance. If you use quotation marks in the 2da, anything within them will be included. I could have used "Dot Eater" instead of DotEater.
MODEL - This is the 3D cloak model number to be used. We're using the same one as the Fancy cloak, so model #4 for us.
TEXTURE - This is the texture that's to be layed on the cloak model. Our new one is #20 (cloak_020.plt).
ICON - You need to specify an inventory icon. Our new one is #20 (icloak_m_020.plt).
HIDEWING - This is 0 if PC wings will poke through the cloak, 1 if PC wings are to vanish from view while cloak is worn.
HIDETAIL - This is 0 if a PC tail will poke through the cloak, 1 if PC tail is supposed to vanish from view while cloak is worn.
HIDESHOL - Hide armor/clothing left shoulder piece while worn? 1 if yes, 0 if no.
HIDESHOR - Hide armor/clothing right shoulder piece while worn? 1 if yes, 0 if no.
ENVMAP - If marked as default, metal parts will be shiny. If ****, metal parts will be partially transparent (or fully transparent if using the "shiny-chrome" color...good for making partialx or tatteredx cloaks).
Make your changes and save the file.
- Back to the start...
Step 7: Create a Hak File
The next step is the easiest one. Using NWN/utils/nwhak.exe, start yourself a new hak file. Drag/drop in your new cloak_020.plt, icloak_m_020.plt, and cloakmodel.2da files into the hak window. Save the new hak with a filename of your choice (up to 16 characters). You can add the new hak to your module in the toolset, just like any other, and your new cloak will be available for building items for players and NPCs.
- Back to the start...
|
|