Negalith's Creature Animation School
By: Negalith (of the CCP forum) [source]
This tutorial is intended to help the beginner that wants to add animations to a new creature model for Neverwinter Nights. It was originally written for custom content makers working on making creatures for the Community Creature Pack, but it is very informative for anyone that wants to animate a creature.
Quick Jump:
Lesson 1: What Files Make Up a Creature
Lesson 2: The Very Basics of Higherarchy
Lesson 3: What Programs Do I Need to Get to Work?
Lesson 4: Opening Your First MDL File… & Then Saving It
Lesson 5: Working with Pivot Points
Lesson 6: The Frame Bar & Basic Concepts
Lesson 7: Tooling Around Gmax
Lesson 8: What Are the Animations We Will Need to Create for Monsters?
Lesson 9: Animation Viewer and the Aurora Base
Lesson 10: Strike This Pose Again & Again & Again
Lesson 11: Animation Mode - ON
Lesson 12: Supermodels
Lesson 13: Importing and Testing
Lesson 1: What Files Make Up a Creature
First things first in understanding creatures in NWN. For a creature to exist in game, it needs 3 things. First it needs a creature model. This is a .mdl file. It's basically a file that the program uses to hold the information about the shape, size and movement of a 3D object (like a creature). The second part is the "skin" of the creature, which is generally a .tga file (which is very similar to a traditional jpg, gif or bmp). 3D programs like NWN take the .mdl file and wrap the skin .tga file around the 3d object to make it look like what it is supposed to be. Imagine making a boulder. First you would make a sphere 3d object and save it as a .mdl file. Then you would find a cool picture of a big rock, convert it to a .tga in Photoshop and use a 3d modeling program to wrap that picture of a rock around the sphere to make it look like a big 3d rock. The last important part of a creature model in NWN is the 2DA entry. Basically, when NWN uses custom content, it checks a list of resources called a 2da to understand how it should use and make available those resources.
Each creature in NWN has its own .mld file. Creature models can have their own .tga file, they can use the same .tga file as another creature. You can even use several different tga files for the same mdl file. Each creature needs a 1 line entry in the 2da.
Examples
I recently made a Pegasus and a Young Pegasus for the CCP. The two models are exactly the same except the young Pegasus is smaller. The Pegasus and the Young Pegasus each exist as their own .mdl file. Each of these two models use / shares the exact same .tga file to skin them and make them look all nice and white and furry. The CCP has one master 2DA file. Each the Pegasus and the Young Pegasus have their own line of data in that single 2Da file. In total, 2 new .mdl files, using 1 existing .tga and a 2 new line entries into the existing .2Da file.
I recently made a Pertyon for the CCP. I kludged a new .mdl together from prices of existing .mdls I took the head of the deer .mdl. I took the main body and wings (made larger) from the black bird .mdl. I took talons from someplace else. I put together all of these bits into their own new and unique .mdl file. Now to skin the creature, I used the same skin (.tga) as the deer to skin the pertyon's head. I used a different skin (.tga) from the blackbird to skin the wings and body. I used a third skin (.tga) to skin the talons. Then I made an entry into the existing CCP 2DA. The Pertyon 1 new .mdl file, 3 existing .tga files and one new line entry into the existing 2DA.
- Back to the start...
Lesson 2: The Very Basics of Higherarchy
This will be a short lesson, but I think it’s important at this point to get a sence of what a creature really is.
Here were going to talk about the model of the creature (it’s .mdl file). Creatures are generally made up by piecing together several smaller objects. If I were going to make a wagon (yes a wagon as a creature, cut me some slack), I would make the main body as one part, and each of the four wheels as separate parts. Why? Because any model part that is going to move independently of other parts needs to be it’s own part! I would make each wheel its own part because I want them each to turn / spin relative to the main body of the wagon. If I decided I wanted a barrel in the back of the wagon to jostle around as the wagon moved, I would have to make that in independent object as well.
When animating, we take different pieces that comprise the model as a whole and tell them where to move relative to each other. In animating creature models, too few individual parts are much more of a problem than too many. The more pieces, the more freedom of motion the animator has. Many times I been irritated that model builders have made the body, beck and tail of a creature as one single piece. This is a problem because the neck, body and tail will NEVER move. How crappy does a creature like a dragon look it it’s neck and tail never move. On the other hand, I’ve never had a problem with too many pieces. More pieces make more movement options and a more natural looking range of motions.
Now… Pieces get “linked” together. This linking is how the whole of a monster stays together despite being many individual parts. Linking is kind of like a chain or a root system. Piece links to piece links to piece. If I were building a person, I would link the four fingers and thumb to the hand. The hand is called the parent and the fingers the children in that relationship. Then hand then links to the forearm; in this relationship, the hand is the child and the forearm is the parent. A piece can have several children but only 1 parent. Generally speaking, any place a model builder wants a model to have a joint and bend is made my having two pieces meet there. In our hand example, the wrist can bend and twist because the “wrist” is a junction point between the hand piece and the forearm piece. We don’t twist the wrist (there really is no wrist piece), instead we move the hand pieve relative to the forearm piece. This chain of links that hold the whole thing together is called higherarchy. Another VERY important lesson about higherarchy, and IM going to say this in caps because it crucial…
MOVING A PARENT WILL MOVE ALL OF IT”S CHILDREN AS IF THEY WERE GLUED TO IT !!!
MOVING A CHILD HAS NO EFFECT ON THE PARENT!!!
In out earlier hand example, If I twist around the hand, all of the fingers will come with it, but the forearm remains motionless. That’s why, when animating, it’s important to think about moving the eldest parent first so that other parts go with. If I were going to make a model creature swing a sword, I would not start with the hand. I would start by twisting the torso, followed by moving the upper arm, then the forearm then the hand.
- Back to the start...
Lesson 3: What Programs Do I Need to Get to Work?
To begin, there are a few programs that you will need to have and be familiar with in order to animate creatures for NWN . Here is a list of what they are and where they can be found. Specifics about using them will be dealt with in later lessons. For now, please simply familiarize your self with what each program is for and acquiring it.
NWN HotU- This is a no brainer. You need Neverwinter Nights. I assume you have it up and running.
CEP2.0 – The CCP shares several resources with CEP. You really should have CEP on your machine if your doing anything with NWN these days.
The CCP Hack- We have recently released a CCP Audit version for people involved in the project to play test and look for problems. Models you will be improving the animations of will need to be taken from this HAK file. A download link is provided below. You will want to download it and unzip the file. It will then have a folder with two files. A .hak file and a .mod file. Move the .hak file into the NWN / HAK folder. Move the .mod file into the NWN / Module folder.
http://www.successdevelopmentservices.com/ccp/CCPaudit.zip
NWNexplorer – This is a simple program that allows you to look at the individual files contained in HAK packs. Most importantly, it allows you to export individual files you want from HAK packs. You will generally use this to export .mdl files from the HAK pack you want to improve animations for.
http://nwvault.ign.com/View.php?view=Other.Detail&id=1369x
NWhak- This is another program that comes free with NWN. You probably already have it in your NWN / Utils folder. This is the program that lets you add several files together (such as .mdl .tga and .2DA) and compiles them into one HAK file. It will be important to you because you will use it to reintegrate models you have tinkered with back into the CCP HAK to see how your work looks in the actual NWN game.
Gmax- Gmax is a freeware downloadable version of 3D Studio Max. (often called 3DSM). 3DSM is the program used by virtually every serious 3D computer artist on earth. Gmax is a free version lacking some of the higher end tools. It exists primarily for people just like us who are using it to make shareware modifications to existing videogames. Gmax is the program you will use to actually do the animations of the creature objects in the .mdl file. You can download it for free here. You may have to email the company for a free activation code and sometimes that takes as long as a day to receive.
http://files.turbosquid.com/Products/L567271/XFM83W83US/gmax12.exe
NWmax- NWN max was made by other people like us in the NWN custom content community to make Gmax more NWN friendly. It also incorporates several independently developed tools for making the Gmax experience easier for NWN builders. This program can be downloaded for free. It should only be installed once Gmax is installed and running. You will never open Gmax by itself from this point forward. When you need to model or animate in Gmax, you will open NWmax and it will open Gmax for you. NWmax are separate programs that work in tandem. Think of NWmax as a master program that opens Gmax as an application within it. I don’t even have Gmax on my quick launch bar, I have NWN max, because NWmax starts up Gmax automatically.
http://nwmax.dladventures.com/download/NWmax-gmax-v0_8setup.exe
Homework… Get all seven of these programs operational before moving to the next lesson.
- Back to the start...
Lesson 4: Opening Your First MDL File… & Then Saving It
When I first beginning to try and work on custom content in Gmax, the greatest challenge that made me give up for quite some time was the inability to figure out something so simple as opening and saving a .mdl file. This next lesson will teach you in 20 minutes how to do something I stressed out over for a week.
First we are going to grab a creature model we went to play with.. Open your copy of Nwnexplorer. Look over to the left menu to where it says “NWN Hak files”. Press the + symbol left of that. Now look for the one that say “The CCP.hak” Press the + symbol left of that. Several folders will now be shown that hold the HAKs “blueprints”, “game data” and such (about 11 in all). Find the one that says “Models” (not “Models, server”). Click the + to the left of it. You are now looking at a listing of all the creature models in the CCP hak. You will notice that most are named c_ something… That c_ is the standard convention to let people know that a model is a creature. Notice how many of our modelers didn’t even bother Sad. Now let’s find the one called, “c_axebeak.mdl”. Youll have to scroll down a bit to find it. It’s in alphabetical order, but names that start with capitol letters are before those with lower case letters. When you find it, right click it and choose “Export”. You will get a standard windows save menu. Save it someplace you can find it again easily. Close up Nwnexplorer.
Next, we will open the NWmax program (NOT GMAX). NWmax will open Gmax for us. You will see the Gmax environment now. On the left side will be a special NWmax control bar. At the bottom right of your monitor by your clock should now be a green NWmax icon indicating that all is well and ready to go. My earliest problem was trying to open and save .mdl files in Gmax. We use the NWMmax tools for this only. Look to that big ominous NWmax tool bar on your left. Don’t let it intimidate you, in time it will be your best friend. Look for “MDL Loading”. Click the + to the left of it. You will now see a section that says “Filename” with a “Browse” button beneath it. Press the “Browse” button. Navigate, find and select “c_axebeak.mdl” where ever you saved it earlier in normal windows open window style. Next, below this under options, make sure the circle next to “Import Geom+Anims” is checked. This is telling NWmax you want to bring in both the model objects and the animations associated with them. Now, about 2 inches lower, find and click the “Import” button. Congratulations, you have loaded the Ax Beak model into Gmax.
Now you should see the white wire frame depiction of the Ax Beak model in 4 different windows. Note the blue box or tile area at the creature’s feet in each box. This is the Aurora Base and it is very important. Well deal with it a lot more later. For now, Right click the Aurora Base ( in any of the 4 possible windows). Along the far right column, look for a field that says “Name and Color” with “c_axebeak” within it. Go over there and change it to “c_axebeak2”. You have changed what the Aurora base is called, and by doing such you have changed what the name of this model file will be when you save it in a few minutes.
Look on top of that right hand column again. Were looking for a little blue symbol that looks like a little blue rainbow that says “modify” when your cursor hovers over it (it should be 4 left of the easy to see little hammer). Click it. We are getting ready to save / export your newly renamed model. Look for a little check box that says “Do Sanity Checks” near the bottom of the left hand column. Always uncheck that, it’s nothing but a pain in the ass. About an inch above that is the “Export” field. Below that is a “browse” button. Click that and navigate to a place you would like to save this new test model to. Now, press the near by button that says “Export Model+Anim”. At the lower left corner you’ll see some black text scroll across a small white area and that’s about it.
Congratulations. You have exported a single mdl file with nwnexplorer, opened it with NWmax / Gmax, renamed it and exported it again.
- Back to the start...
Lesson 5: Working with Pivot Points
Each individual piece of a model has a magical point associated with it called the Pivot point. Whenever you move that abject, it is at that pivot point that the object itself pivots / rotates upon. When you select a model piece / object in Gmax, you are made aware of exactly where the pivot point is by seeing where the red, blue, and green arrow lines meet (sometimes there orange and say X and Y, with the Z one kind of grey). If you try to rotate the object you will see that pivot point remaining stationary, as the rest of the object orbits it. Pivot placement is very important when it comes to animating a model. Often times with modelers are in a hurry to make a model, they do not spend the time setting pivots that are suitable for good animations. You will likely have to set a new pivot point form time to time, but don’t worry. It’s easy.
Let’s think about our arm and hand example we have used so often in these lessons. Were I to make an arm and hand, I would be sure that the pivot points of any given part were right were that part connects to it’s parent. Each finger would have it’s pivot point very near to where the finger joined with the hand. The hand should have it’s pivot point very near the wrist where it joined the forearm. The forearms pivot would be the elbow where it connects to the upper arm. Finally the upper arm’s pivot would be at the shoulder where it connects to the torso. Why? Because rotating an objects pivot is how you make the object move. Let’s say I wanted to animate a person thrusting his hand into the air like raising his hand in class. The first thing I would do would be to rotate the “shoulder joint” like pivot near where the upper arm connects to the torso. Rotating that pivot will rotate the upper arm with it, and this can be done until the upper arm is pointing straight up. Because the lower arm is the child of the upper arm in the higherarchey, the forearm will come along for the ride. Because the hand is the child of the forearm, the hand too will come for the ride. And because the fingers are children of the hand, they come along with the hand which came along with the forearm. Next, I’ll rotate the elbow pivot located on the forearm where it meets the upper arm. I’ll rotate it until the forearm is also straight up. It will drag with it the hand and thus the fingers too. It however will not change the position of the upper arm because MOVING AN OBJECT EFFECTS IT AND IT’S CHILDREN BUT NOT IT’S PARENT. Now, We have a model that we have successfully demonstrated a hand raise with, having only rotated 2 pivot points.
In animating models, you have 2 options about how you can move an object. One is by actually moving that object up, down, right, left, backwards or forwards. The second is by rotating objects on their pivots. A vast majority of creature animations are accomplished through pivoting it’s joints. Rarely will you actually move parts up, down, right or left. When you do actually move an object up, down, left, right, back or forward, it’s generally the main body that pulls all limbs with it. This is used to move forward to attack, move back to dodge an attack, move up and down slightly during a walk or twist and fall down to the ground when dead.
Now… What to do to fix a model piece that has it’s pivot in a crappy place. There are several ways to do this, but I have found one to be far more reliable then other you may see discussed on the internet. When you select an object, you will see it’s pivot indicated by seeing where the red, blue, and green arrow lines meet (sometimes there orange and say X and Y, with the Z one kind of grey). Right click the piece to select it. Look near the top of Gmax for a symbol that looks like a + with arrows going up down, right and left (its called “select and move” when hovered over. You can now right click and hold to select and move around a model piece. Distance the piece you want to fix away from other model piece. Move any other children pieces it may have drug with it away as well. Look to the upper right for something that says “Editable Mesh” with a + sigh before it. If you can’t see it, be sure your object is still selected. Press the +. Press the “vertex” option that appears below. Your model piece now has lots of blue dots. Those are the dots that make all the corners of the model piece. Here is the real trick When you move an object as a whole, it’s pivot point stays in the same place relative to the object it has always been, When you move vertexes, you change the shape of the object, but the pivot remains stationary. If you move ALL of the vertexes, the piece does not change shape, the pivot stays were it was and will be in a new position relative to the location of the changed model piece. Basically, if you can’t move the pivot within the piece, were just going to move the whole piece around the pivot point. Now, select all of those blue vertexes by right clicking and dragging a box around them. They will turn red to indicate they have been selected. Push and Pull on the Green, Blue and Yellow arrows to move all of the vertexes together in the same direction. If the old pivot was too low, drag down all the vertexes so that an unmoving pivot will now end up in the correct place. Now, look over to the upper right and find the “editable mesh” entry again. This time click the words directly, not the – to their left. See how the object become looks like it did be fore we started this. Now, the pivot is in the right place relative to its piece. Now, move the objects children back to it, and move it back to it’s original position.
- Back to the start...
Lesson 6: The Frame Bar & Basic Concepts
Creatures in NWN have several separate animations. Some creatures require more than other. Character models for example have hundreds that depict several emotes as well as fighting styles with dozens of different types of weapon. The average creature we will be working with needs about 42 animations which include a few variety of attacks, being knocked down, walking, running, dodging, casting a spell and being dead.
Creature animations are like a movie in that any short action sequence is made up of several frames. In each frame the creature moves a little bit like how a cartoon is drawn. When an animation plays, it scrolls through these frames in rapid succession to give the impression of movement.
At the bottom of Gmax is the Frame Bar. It basically lets you select which frame of animation you are looking at when you look at the model in the 4 windows. Think of it as looking at a spool of a movie film where you can choose to focus on individual movie frames.
One thing that is important to know is that EVERY animation a creature has will take place on the one and only Frame Bar. Each animation does not have it’s own. Rather, each animation sequence will have allocated to it a particular group of frames on the Frame Bar. For example, a creature may have 42 animations requiring 1400 frames on the frame bar. The walking animation may be frames 100 to 130, and the running animation may be frames 140 – 170. When NWN needs to have a creature run, in this case it would simply play animation frames 140 – 170 over and over. Ultimately there is a way that the animator can decide which frames are allocated to what animations. It has to do with the Aurora base, and I’ll cover that in a later lesson. More often than not however, there is a standard set of animations that use standardized portions of the Frame Bar.
The basics of doing animation is simple. Figure out what animations occur in which span of frames. Manipulate the position or poses of the creature within those frames as you want them to be seen in game. I will of course go into far more detail about how to do this later.
The wonderful thing about Gmax and other modern animation programs is the miracle of “extrapolation”. Unlike poor Walt Disney, we don’t have to pose each frame individually. Rather, we only have to pose the beginning, end and important transitions in-between. Gmax WILL FILL IN THE REST! Lets go back to our hand raising example from a previous lesson. Let’s say that in frame 1 we have our person standing normally. Then we go to frame 40 and manipulate the creature by twisting it’s 2 pivot points to have it’s arm straight in the air. Were we to go back and look at frames 2 – 39, we would see that Gmax has filled those in for us, having the arm in various stages of the process of raising his arm. In a few more lessons, well start doing some of this, There are other things I need to teach you first.
- Back to the start...
Lesson 7: Tooling Around Gmax
In this lesson I am going to talk about some of the important controls you’ll have to become accustomed with in order to work in Gmax.
The 4 view windows are completely changeable, I generally make the “perspective” window very large and the others very small. You can just left click on the boundaries and adjust them
You can minimize the NWmax control panel on the left. I generally do. DO NOT X exit out of it. It’s important and I don’t know how to bring it back without restarting NWmax and Gmax together.
First of all, you can normally select objects one at a time by left clicking them. You can also hold down the left mouse button to drew a box around several objects to select them all. If you hold down the “Ctrl” button on your keyboard, you can add or remove objects to those already selected.
I zoom my view in and out using the wheel on my mouse. I’m not sure how those of you without a wheel mouse would do this. If you know or figure it out, please comment below.
You can slide your view up, down, right or right by right clicking and holding you mouse wheel on an open area and moving your mouse in the desired direction.
You can rotate your view around a model by holding down your mouse wheel and the “Alt” key and then moving your mouse.
Sometimes you will want to see what is linked to what in parent child relationships. Doing this is easy. Select an object normally so that it has the white box around it. If you want to see it’s parent, press the “Page Up” button. The parent object will now be selected. If you press the “page down” button, all of the objects children will instead become selected.
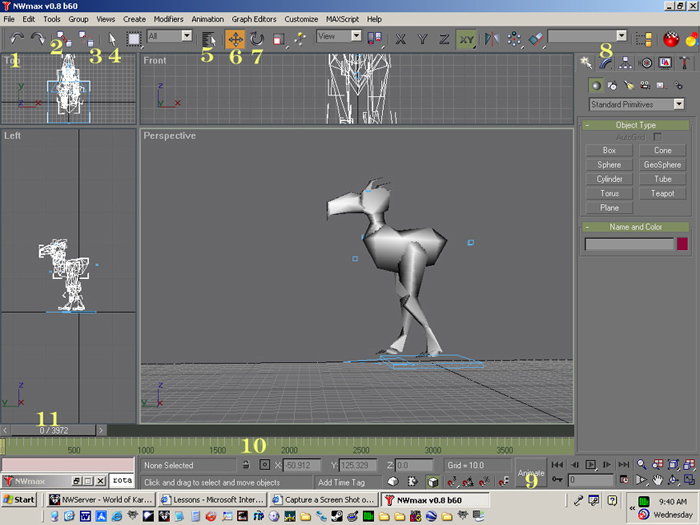
Here is a picture of my Gmax window so I can point out some of the most relevant buttons and controls. Please note that NWmax is minimized.
1 “Undo”- You will use this button frequently. It simply negates the last mistake you made. I use it a lot when I have accidentally selected the wrong object and moved it before realizing I had the wrong object.
2 “Select and Link”- You’ll not likely have to use this one often, but just in case, it is important. Remember earlier we talked about higherarchy. Well, this is the button that lets you link objects together. Sometimes as an animator you’ll find that a modeler has linked things together in a goofy way and corrections are needed. This is how you do it. You always connect child to parent! NEVER PARENT TO CHILD!
3 “Unlink Selection”- This control breaks any links a selected object or objects many have. It ends all parent and child relationships.
4 “Select Object”- A simple button. When it is pressed down, it simply means you can select object by left clicking them.
5 “Select by Name”- This button will bring up a pop up list of all model objects by name. Rather than selecting and deselecting objects by clicking them directly, you can select them by clicking their names in this pop up box. It makes it a lot easier for hard to reach pieces.
6 “Select and Move”- When this button is depressed, model pieces that are selected can be moved around. I recommend that moving of objects be done by Right clicking and holding on the arrows rather then the object itself. If you grab the object itself and move it, its free to move in any direction and often will shift in ways hard to notice form your perspective. When you move with the arrows, the object con only move along the axis of the arrow your holding.
7 “Select and Rotate”- One of the most important buttons for animators. This is the button that when depressed allows an animator to rotate an object around it’s Pivot point as described in Lesson 5. Like with the “Select and Move” button, I recommend that you rotate objects by manipulating the blue, red and green line arrows that point to the objects Pivot point. Think of each of these lines as a knob on the pivot that you can turn clockwise or counter clockwise, which will in turn swivel the Pivot, which will in turn swivel the entire part (which will also carry along any of that object’s children and children’s children).
8 “Modify Tab”- Remember the blue rainbow I talked about in an earlier lesson? This is it. You will use this whenever you want to make any changes to an object other than it’s placement. Changing piece names, and shapes are done with the help of this tab.
9 “Toggle Animation Mode”- Another very important button for animators. This button when depressed tells Gmax if your working on the model in it’s base / primal form, or if your altering is pose in various frames. The default for this is off and gray. When it is like this, anything you do to the model is being done to the original non animated form of the model. When it is depressed and red, any changes you make are changes specific to the frame you are in. I’ll talk about this a lot more in later lessons.
10 “Animation Frame Bar”- This bar shows the array of animation frames that a model exists in various forms across. If a creature’s animations take up 1400 frames, there will be 1400 frame designators lined up down here. In our picture above, 3972 frames are arrayed here.
11 “Animation Frame Shuttle” – This little slider moves back and forth across the top of the Frame Bar. It tells you what frame your viewing out of how many there are in total. If you want to look at various different frames, you slide this back and forth to focus in on the frame you want. The number it indicates on the left is the number of the frame you are seeing in all 4 of your view windows.
- Back to the start...
Lesson 8: What Are the Animations We Will Need to Create for Monsters?
Here is a list of the standard creature animations we will use as well as a short description of each.
* I find it best if all of these animations begin and end in the exact same creature pose.
creadyr- (Ready Right)- The creature is in combat but not actively dodging or attacking at the moment. It’s a passive animation of sorts of the creature in a combat stance. Generally a bit of shifting about, head moving and arms raised defensively is appropriate. I’m not sure exactly how it differs from creadyl, I generally make them both the same. *
creadyl- (Ready Left)- The creature is in combat but not actively dodging or attacking at the moment. It’s a passive animation of sorts of the creature in a combat stance. Generally a bit of shifting about, head moving and arms raised defensively is appropriate. I’m not sure exactly how it differs from creadyr, I generally make them both the same. *
cdamagel- (Damaged from the Left)- The creature has been struck from the left side of it’s body. A shrug from the impact is an appropriate animation. *
cdamager--(Damaged from the Right)- The creature has been struck from the right side of it’s body. A shrug from the impact is an appropriate animation. *
cdamages- (Damaged from a Stab)- Somebody has thrust a weapon at the creature straight into it’s chest. Animation should be a recoiling shrug. *
cpause1- (Pause)- This is the animation a creature does when it its not actively engaged in combat or threatened. Generally the creature looks around a bit, shifts somewhat, wags it’s tail etc. *
ca1slashl- (Slash Left)- Creature makes a slashing attack from it’s left limb(s). *
cwalk- (Walk)- This is the animation of the creature walking. It’s often one of the more difficult animations to do.
cclosel- (Attack Close Low) The creature makes an attack against a target close to it and low to the ground. *
ca1slashr- (Slash Right)- Creature makes a slashing attack with it’s right limb(s) *
ca1stab- (Creature Stab)- Creature makes a thrusting, stabbing attack it it’s foe. *
ccloseh- (Attack Close High) – Creature attacks a foe near to it and high off the ground such as batting a fly away from near it’s face. *
creach- (Attack Reach)- The creature lunges to attack a foe farther away then normal. *
cparryr- (Parry Right)- The creature parries an attack form it’s right. *
cparryl- (Parry Left)- The creature parries an attack form it’s left. *
cdodgelr- (Dodge Low)- Creature dodges an attack by ducking to the ground, It’s not generally reasonable for creature that are larger than man sized of for those with shapes that are not conducive to ducking. In such case, do something similar to cdodges described below. *
cdodges- (Dodge Sidestep)- Creature evades an attack by stepping back and to the side. *
ckdbck- (Knocked Down)- Creature is knocked down to a Prone position. animation should start at the normal ready position and end with the creature in a prone position.
ckdbckps- (Prone) This is a looping animation of the creature laying prone. It should start with the prone pose and end with the prone pose with nothing in between.
ckdbckdmg- (Hit When Prone)- This animation is played when the prone creature is hit. It should start with the prone pose, end with the prone pose and someplace in the middle have a shrug.
Ckdbckdie (Killed)- This animation plays when a creature is killed. Please note that when a creature is killed, the knocked down animation in played prior to this one. This animation should take a creature from the Prone position to the Dead position, NOT from Ready to Dead. If you make this animation Ready to Dead, when the creature is killed, he will fall down, stand back up and than fall down dead. It looks bad, don’t do it. HOWEVER… many people do make the Prone pose and the Dead pose the same. If you want to do this, make sure this animation is Prone / Dead to Prone / Dead with nothing in between (no transition from prone to dead is needed if there are going to be the same).
cdead- (Dead)- This is a looping animation of the creature being dead. Whenever you see a dead creature laying on the ground in NWN, it’s this animation over and over again. It should start with Dead pose and end with Dead pose EXACTLEY THE SAME. Noting in between. Nothing worse then a dead creature jerking and shaking as this animation loops.
cguptokdb- (Down, Up, Down) this rarely used animation is for when a creature is knocked prone, begins to get back up and is again knocked prone. It needs to start and end with the prone pose. In the middle should be the poor beasts feeble attempt to stand back up.
cgustandb- (Stand Up)- This animation is simply the creature transition from starting Prone and going back up to Ready. Doing it well is among the most challenging animations.
ccwalkf- (Combat Walk Forward) – A full forward step like a creature would do in the middle of combat. *
ccwalkb- (Combat Walk Backwards) -A full backwards step like a creature would do in the middle of combat. *
ccwalkl- (Combat Walk Left)- A combat move to the left. Often a hop or a jump. *
ccwalkr- (Combat Walk Right)- A combat move to the Right. Often a hop or a jump. *
cgetmid- (Get Middle)- Sometime creatures stay in a ducking pose. This animation is a creature transition from standing Ready to being in a Ducked down position.
chturnl- (Head Turn Left)- The creature simply looks over to it left. *
chturnr- (Head Turn Right)- The creature simply looks over to it’s right. *
ctaunt- (Taunt)- The creature taunts a foe. This can be laughing or doing something intimidating like growling going up on it’s haunches. *
cconjure1- (Cast spell)- This is casting a short spell. Starts and ends with Ready. In the middle it should have hand waving and jaw speaking incantations. *
ccastoutlp – (Long casting) – This is a looking animation for when a creature is casting a spell over a prolonged period of time. It should not begin and end with the Ready pose. It should include lots of hand waving and the head and jaw mouthing incantations.
cappear- (Appear)- I think this is for when a creature is first created. Generally it depicts the creature starting VERY high and dropping down from the sky into the Ready position.
disappear- (Disappear Start)- I think that when a creature is made to magically disappear somehow, it leaps back up into the air. This is supposed to be the precursor animation where the creature makes the initial squat in preparation for the jump. Most people just make it similar to the standard Ready animation.
ccastout- (Start Long Cast)- Remember the ccastoutlp animation mentioned above of the long spell casting that goes on and on. This is the animation that begins it. It should start with creature in the ready pose and end with creature in the same pose he begins the ccastoutlp animation at.
cgetmidlp- (Middle Looping)- Remember the cgetmid animation earlier when the creature moves down into a Ducked down pose? Well, this one is just a looping of that Ducked down pose. It should both begin and end in the same way that cgetmid ended.
cspasm- (Spasm)- Such as when a creature is poisoned or such and has a spasm. Should begin and end with Ready pose. In between the creature should shake and twitch. *
crun- (Run)- This is a running looping animation. It should be very similar to the walking one, but you may want to make it look like a more vigorous effort; head more forward, a bit more bounce.
ccturnr- (Combat Turn Right) - Supposedly a creature turning to the right in combat. I make mine similar to the Combat Move Right animation. Funny how I don’t seem to see any documentation of a ccturnl animation.
cdisappearlp- (Disappear)- This animation is supposed to be the creature leaping forward / up and disappearing. I don’t think I’ve ever seen it used. I cant’ imagine why the disappearing animation would loop. I just make this similar to one of the combat ready animations, the taunt animation or the conjure animation.
********************************************************
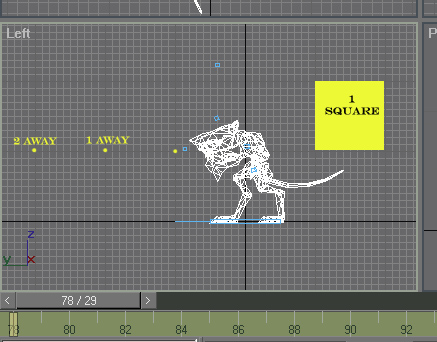
A NOTE ABOUT ATTACK DISTANCES: Different attacks are animated with the creatures striking various distances form themselves. Here is a general guide. The two close animations (ccloseh and cclosel) should keep the attacks within the same “Squares” they stand in. The normal attacks like ca1slashr and ca1stab should have a creature reaching out about 1 “Square” away for those attacks. For the long range one, creach, the attacker should lunge out 2 boxes beyond his normal personal space. The image below represents a bit what I mean.
- Back to the start...
Lesson 9: Animation Viewer and the Aurora Base
In a prior lesson I told you that that NWN knows what frames are used for what animations. I also told you that these could be modified by an animator if need be. This is where you learn all about that. First of all, there is a field on the Aurora Base of all creatures that tells NWN which animations use which frames. If you select the Aurora Base and click the Modify (blue rainbow) tab, you can scroll down the column on the right (somewhat below the buttons you use to save / export an animation) where you will see a rather large field called “ Animations on Model” that looks like the picture below. This is the data that tells NWN what frames comprise which animation set. It also tells you what frames you should compose which animations on.
Please note that on the image below, I have fiddled a bit with the size of the right hand column so that you can see it all in the picture. For you to find it, you will have to scroll below the section that deals with exporting models. Again you must select the aurora base and press the blue rainbow Modify tab.
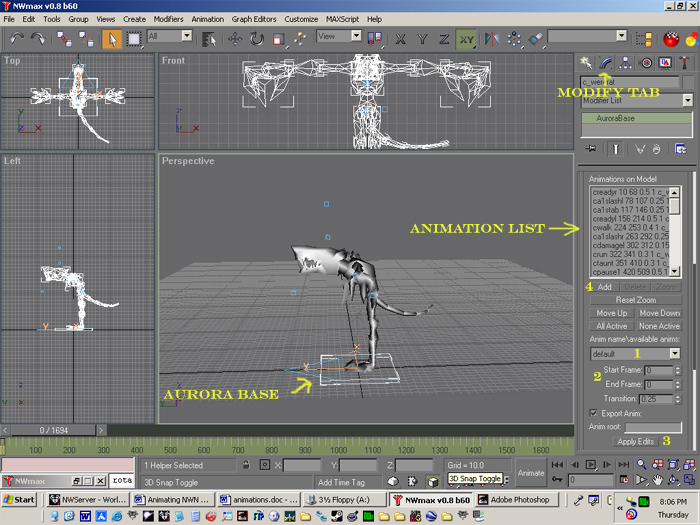
Now, if you ever need to change what frames animations use, you can select that animation name. Then, then by the yellow 2 in our picture you can see where the frame start and end are displayed. You can change those. After that you press the “Apply Edits” button near the yellow 3. You should try to keep a 10 frame space between animations. BE CAUTION YOUR EDITS DON’T OVERLAP OTHER ANIMATION RANGES! If you need to add an animation to the animation list that isn’t there, you do not type in the animation name, rather you select it from a pull down menu that I have marked with a yellow 1. After that you will have to enter the start and end frame to something higher than the existing ones(2); and press Add (3).
If the animation list is really screwed up, there is always the NUCLEAR OPTION!!
That’s deleting the Aurora Base completely and adding a new one. First, find out what objects are children of the Aurora Base. Select the Aurora Base, highlight it’s name and copy it. Select the Aurora base and the little arrow thing in front of it. Go to the top edit menu and choose delete. Now that its gone, we need to make a new one. Choose the Create Tab, just left of the blue rainbow modify tab. Below it, look for a little icon called helpers that looks like a tape measure (its between the movie camera and the gears). Now press the button that appears that says “AuroraBase”. Press the left mouse button anyplace in the view window. A little pop up will appear. Check the boxes for “Add standard anim keys” and “Center to (0,0,0,). Past the name of the prior Aurora base in the bottom field. Click ok. Link all the children of the prior Aurora base to the new Aurora base. This base should have all of the Animations already keyed up.
Now I’m going to teach you to use a very cool tool called the Anim Browser. What it does is lets you zoom in on the animation bar to look at only one select animation at a time. As simple as this sounds, it makes it a LOT easier. First, we look over at the NWmax left control bar. Maximize it up again if you have it minimized. Look for “Anim Tools” and press the + left of it. Now look down for the “Anim Browser” button and click it. Scoot the window that pops up in to an out of the way place. Click the “Pick Model Base” button and then click the Aurora Base. Poof, all of the animations on the Aurora Base are now also listed in that pop up window. Now, when you double click on an animation name listed in that pop up box, it will limit the animation slider bar to only displaying the range of that particular animation sequence.
A small warning… Anim Browser will not work for animations that are only 1 frame long. The cdead and cgetmidlp animations are keyed as 1 animation long by default and thus Anim Browser does not display them. You can make them 3 or 4 frames long if you like as talked about earlier. When you make changes to the animations on the Aurora base, you also have to press “refresh” on Anim Browser for them to be reflected.
- Back to the start...
Lesson 10: Strike This Pose Again & Again & Again
This is a short lesson but a very important one. When animating, there will be MANY times where you will want one frame to look exactly like another one. This is VERY hard to manage by moving objects by eye, but Very easy to do with a simple technique. Let’s say that frame 1 looks the way you want your creature to be standing in it’s Ready pose. The one you want to begin and end most animation sequences in…. Here is an easy way to copy that pose wherever you want it.
First, select the entire model by making a select box around it. Right click on the Shuttle Slider (the thing that sits on top of the Frame Bar and tells you what frame your looking at). A small pop up window will appear. Where it says “Source Time”, enter 1. Where it says “Destination Time” enter the number of the frame you want your pose copied to. Press ok. Poof, you have copied an exact pose from one frame to another.
Tip… this method IS discriminatory of the parts you have selected when you do it. If you miss a piece or two when you do the select box, you may get some strange results as those pieces will not have their position copied. You can use this to your advantage as well if you only want to copy some body part movements but not others.
- Back to the start...
Lesson 11: Animation Mode - ON

Now we get to some of the real dirt. Were actually going to do a real animation together. But first a small lesson. There is a very important button used when animating. It’s the “Animate” button located on the lower right of Gmax. You can see it in the picture below indicated the number 1. When it’s off its grey. When it’s active, its red (and the perspective window gets a red border as well). When this button is depressed, you are making changed in the pose of the model that effect primarily the frame you have selected. When you make changes in a model without this button pressed, you are making over all changes to the fundamental pose of the model. Be cautious to know when your doing each. For the most part, once a model is done, you won’t change it much, and movements will be for the sake of animation.
Also… See the little button below the yellow 2. The arrow in the box. That’s the play button. You can press it to watch the animation sequence.
First, open Nwnexplorer.
Use Nwnexplorer to extract “c_axebeak3.mdl” from the CCP hak (lesson 4)
Close Nwnexplorer.
Open NWmax ( and Gmax will open with it)
Use the NWmax bar to open “c_axebeak3.mdl” in Gmax (lesson 4)
Use the NWmax bar to open the “Anim Browser” tool. (lesson 9)
Minimize NWmax.
Put the animations from the Aurora Base into “Anim Browser” (lesson 9).
Move the “Anim Browser” off to the left and make the Perspective window big.
Delete “c_axebeak3.mdl” from what ever place you saved it to before loading.
There we go… All ready to get to work now.

First, I want to choose an animation that is easy to test. Were going to do the “cpause1” animation. This is the animation that plays when the creature really doesn’t have anything else to do. It’s not hostile or expecting combat and is just milling around doing it’s every day thing. Why this one? It’s long and it is played constantly by peaceful creatures and is thus easy to test.
Go into “Anim Browser and double click “cpause1” ( its about 3/4 th down)
On the frame bar, you will now see frames 2150 – 2349.
Rotate your view so that your looking at the side of the axe beak.
Press the play button and watch the original animations a few times.
Press the play button again to stop it (it looks a bit different when depressed)
Now, were going to eliminate the existing animations
Use the select box to select the entire model (all pieces).
See all the blue marks that have appeared on the frame bar. Those indicate frames within which the original animator positioned posed different parts of the creature. If you want, play the animation again a few times to see if you can see how the blue “keys” match up with the animation you see.
Now, make a select box on the Frame Bar to select all of those blue keys. When you do, they will turn green. Left click the Frame Bar now and select “Delete selected keys”. If any blue ones survived, get those now. After that, select the whole of the model again to be sure you got um all.
Hit play again and watch what the model does….Nothing.
We always want an animation to begin and end a particular way. Most times this is the “READY” stance. In this case, like many we will use the pose from frame one.
Use the technique I taught in lesson 10 to copy the pose from frame 1 to frames 2150 and 2349.
Now were really ready to animate.
Move the shuttle slider to someplace around frame 2200.
Press the “select and rotate” button up top.
Press the “Animate” button at the bottom.
Select the creature head.
See those three arrows, Click and hold the blue one when moving the mouse. It will position the head to swivel right and left. Click and hold the red one and move the mouse and it will nod it’s head up and down. Do the same green one and it will cock it’s head like a confused dog. Do one or two of these.
Move the Frame Slider Shuttle to frame 2300.
Pick another piece or two and move them in a way you think would look cool.
Hit the play button to watch your work.
Export / Save your model as described in lesson 4.
Congratulations, you’re an animator!
Though there will be a few more lessons.
Extra credit for anybody who tells me what was wrong with that model.
- Back to the start...
Lesson 12: Supermodels
Sometimes when you have several models that are very similar in body shape, you can skip doing animations all together. You can simply tell the model to use the animations that exist on a different model. A perfect example of this is when you have creatures of different sizes but otherwise the same. Recently I animated a frog model. Later when I made the giant frog, I did not animate that large one as well, I simply used the “Supermodel” that told it…. Act like your little brother.
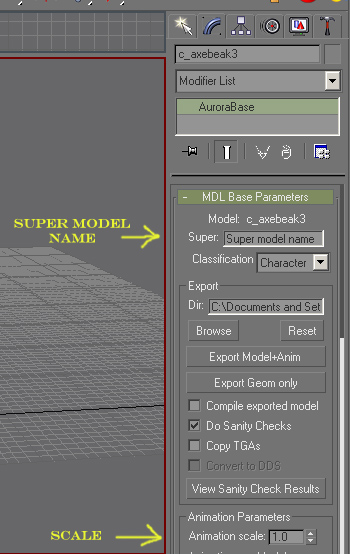
For the supermodel to work at all, it must be set correctly. First of all, both models must have their corresponding parts named the exactly same. If one creature’s head is named “wolfhead” and the other is named “eaglehead”. The head will never get any of the movements transferred from the original animation. If you have to rename parts to make them match, rename the parts on the model inheriting the animation not the one that has the working animations. Next be sure to remove each and every animation listing on the Aurora Base’s “ Animations on Model” under the Modify tab (blue rainbow). If you have a supermodel designated or not, having animations names listed in that queue will prevent NWN from using the supermodel animations from the other model. Also, because your new model should have no animations of it’s own. Select the entire model and delete all the animation keys on the Frame Bar. Having those motions only makes the file larger than it has to be (sometimes 10X as large). Lastly, you need to insert the name of the .mdl file in the “super” area are the supermodel that actually has the animations you want this one to use. The .mdl is not needed ( looks like c_name )
Using a supermodel for a creature animation is an all or nothing proposition. When you use the supermodel option, every and only the animations on the original model carry over to the new one. You can not pick and choose. If the attacks look great but the walk sucks, your stuck with both. I at one time had hoped that I could use a supermodel for most animations and then simply add a few to the Aurora Base to supplant ones that needed to be different. This did not work.
Occasionally when you use a supermodel, you will find that in game the new model will look very strange. It will either look stretched out / “exploded” with the different pieces much farther apart than they should be or they will be crunched together. This is a problem in the “Animation Scale” Basically, when you use the animations from one model, it does not translate them well into the size of the new model. It puts all the pieces the same distances apart in the new model as in the original. You can compensate for this by changing what the animation scale is. If it is set to 1, that tells NWN that both models are the same size and to transfer the animations over normally. If you set the animation scale to .5, your telling NWN that the new model is only half the size of the original, and thus all the distances between parts have to be half as well. If you set the Animation scale to 2, it tells NWN that the new model is twice as big and the distances between parts needs to be doubled.
When you use the scale wizard, SOMETIMES it will change the Animation Scale for you as needed. It depends on how you do it. Lets take my frog. When I made and animated my frog. I exported it, then decided I wanted a larger one. I removed all the animations and entered the original frog’s file name as the supermodel. Then I rescaled it with the scale wizard. Because the scale wizard saw a supermodel was set, it adjusted the scale accordingly. Had I rescaled the frog before designating a supermodel, the scale wizard would not have known to also adjust the Animation scale so I would have to have don’t that myself or had found my pieces the wrong distance apart.
As a side note… almost all humanoid models use “a_ba” as their super model. This one has a very rich variety of combat and non combat animations. But… It only works for upright creatures with 2 arms and 2 legs.
- Back to the start...
Lesson 13: Importing and Testing
In this lesson, I’m going to show you how to reintegrate “c_axebeak3.mdl” that you changed the cpause1 animation on, back into the CCP HAK.
First, run that copy of Nwhak I told you to get familiar with in lesson 3.
Go to the file menu, choose open, navigate to your NWN / Hak folder and select “The CCP.hak”. It will take a few moments because CCP is big.
Now… Choose the press the “Resource” menu and choose “Add”. Navigate to wherever easy to find place you saved “c_axebeak3.mdl”, and Double click it.
When it asks if you would like to replace it, choose “yes”.
Now, lets save the changes we’ve made. Choose the File menu again and pick “Save”. About 20 seconds later and its done. Choose File and Exit. To close.
Now, let’s actually look at your changes. First, remember that mod file. “CCP Audit Test” that I told you to put in your NWN Module folder back in lesson 3? Now were going to use it. Open up the Aurora Tool Set. Open an existing module, “CCP Audit test”. Open the only area and find the “Test Creature”. Open his properties. Under the basic tab, go to the “appearance” pull down menu and choose “CCP Axe Beak A”. GO to the advanced tab and set it’s “Faction” to Commoner. Click OK on the creature properties. Safe the module. Exit out.
Now, run NWN and play the module. CCP Audit test. Walk up on the creature and watch his animation you created.
- Back to the start...
|
|