How To: Re-Skin Creature Textures
By: Robin Mayne [source]
Modified By: The Amethyst Dragon
This tutorial will show you how to take one of the creature textures from Neverwinter Nights, modify it, and use it to create a modified version of the creature.
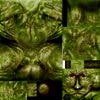
Original Texture |
Original Troll |
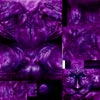
Modified Texture |
Modified Troll |
Quick Jump:
Step 1: Acquire Original Creature Texture
Step 2: Modifying the Texture
Step 3: Converting the Texture to DDS
Step 4: Creating a Hak Pak
Step 5: Using a Hak Pak
Step 6: What Now?
Step 1: Acquire Original Creature Texture
The first thing that is needed is one of the original creature textures from the game. It may be a good idea to run through this quick How To: Extract a Game Resource tutorial before retexturing...it will give you access to all the artwork and other resources included with the game.
For this tutorial, we want the creature texture for the troll model. That file name is c_troll.dds. Export it as a .tga file, since that is the format that can be used by different image editing programs.
- Back to the start...
Step 2: Modifying the Texture
Using an image editor of your choice that supports the Targa (.tga) format, open and edit the texture. Example software includes Photoshop, Paint Shop Pro, and GIMP.
You can modify the texture in several ways. Painting on tattoo patterns, or modifying the color balances are two ideas, but you are only limited by your imagination!
Original Texture |
----> Adjust Hue? Modify color balance? Paint over parts? -----> |
Modified Texture |
Once you are done with your modifications, save the images as Targa (.tga) files, (selecting the '24 bits/pixel' and 'uncompressed' options of your software).
The filenames of textures are important, as you can only use them in the toolset if they use the exact name of the texture image in the game. So the 'c_troll' texture that you download must retain the 'c_troll' filename if it to be recognized by the game as the texture for the troll model.
- Back to the start...
Step 3: Converting the Texture to DDS
If your are reskinning an existing creature (such as the troll) that uses a .dds texture, you will need to convert the newly modified .tga image to the compressed format that is recognized by the game.
BioWare has created a compression tool for this process which we use internally. It is available to download as a free, unsupported Windows utility.
Instructions for using the DDS Compression Tool
After unzipping the tool, you will find 2 files in the 'dds' folder (processtextures.exe and runme.bat) along with 2 directories labelled 'in' and 'out'.

1. Place the .tga you wish to compress into the 'in' folder.
2. Double-click the 'runme.bat' in the 'dds' folder. This will convert the texture from .tga format to the compressed .dds format that is needed for the game. You will find the converted texture in the 'out' folder. It will have the same filename as the original, but with the .dds file extension. The 'c_troll.tga' texture I started with is now 'c_troll.dds'.
Notes about the DDS Compression Tool
The DDS Compression Tool is a free, unsupported Windows utility that will not work on all video cards. It is dependant on your video card and drivers supporting the required compression. Most DirectX 8 drivers should work - I have tested it on a GeForce3 and Radeon 8500, which worked fine, however the Matrox G550 card I tested did not work.
If you cannot run the DDS Compression Tool, I would suggest finding a friend who can to convert your textures, as this is just a small (though required) step in the overall process of creating your own textures!
- Back to the start...
Step 4: Creating a Hak Pak
Once your textures are ready, you will need to add them to a Hak Pak, which can then be used with your module, and distributed so others can enjoy your creations.
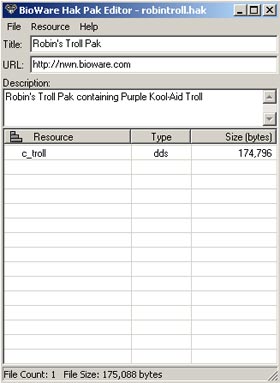
1. The Hak Pak Editor is the 'nwhak.exe' program located in the 'utils' directory where you have installed Neverwinter Nights (The default location is C: \NeverwinterNights \NWN \utils). Double-click the 'nwhak.exe' to start the editor.
2. Add the new .dds texture to the Hak Pak Editor by selecting 'Resource' -> 'Add'. Browse to the location of the .dds file. Select it and click 'Open'.
3. You will now see the texture file listed as a resource in the Hak Pak. Add a title and description to your Hak Pak, and save it to your 'hak' folder where you have installed Neverwinter Nights (The default location is C: \NeverwinterNights \NWN \hak).
- Back to the start...
Step 5: Using a Hak Pak
1. Now that the Hak Pak is in your 'hak' directory, we can add it to a module. Open an existing or new module in the Toolset. Under the 'Edit' menu select 'Module Properties', then select the 'Custom Content' tab. Click on the drop-down list via the small arrow above the Check for Conflicts button. You should see a list of all the Hak Paks you have placed into your hak directory. Select the Hak Pak(s) you want to include in your module and then click the 'Add' button.
Note: This is how Hak Paks are added to a module. Remember that, if you use a Hak Pak in your module, Players must place the same Hak Pak in their 'hak' directory to play the module, so be sure to bundle the Hak Pak with your module when offering it for download!
2. Now that the Hak Pak with the new texture has been added, creatures that use that texture will now have the new skin. In my example, all the Trolls I paint down in my module are purple.
- Back to the start...
Step 6: What Now?
If all you need to do is re-skin an existing creature in the game to give it a new look, then this is all that is needed!
- Back to the start...
|
|