Neverwinter Nights Stand Alone (Dedicated) Server
 The Neverwinter Nights dedicated server is an application that hosts a Neverwinter Nights game but does not run the game client interface. You may want to use the dedicated server if you want to host a game but you don't intend to play in that game for the entire duration. The Neverwinter Nights dedicated server is an application that hosts a Neverwinter Nights game but does not run the game client interface. You may want to use the dedicated server if you want to host a game but you don't intend to play in that game for the entire duration.
Another reason to use the dedicated server would be that you have two computers and want to share the processing load between them (one computer can run the dedicated server and the other one connects to it from the normal Neverwinter Nights game client). Please note that you can also start a server from within the game client or the DM client.
The dedicated server does not 'use up' your CD key. You can run one or more dedicated servers and still run one copy of either your game client or the DM client.
Quick Jump:
Download the Dedicated Server
Windows Dedicated Server Instructions
Starting the Server
Server Description
Hosting Games on the Internet
Port Forwarding
Using the Dedicated Server Interface
Banning Players
Unbanning Players
Download Server v1.69 - (.zip, 578 MB)
You may need to right-click on the links and select "Save As..." or "Save Link As..." (or similar option, depending on your browser software).
Windows:
1. Download and extract the NWNDedicatedServer zip.
2. Run nwserver.exe.
3. For more details on running a server, read below.
Linux:
1. Download and extract the NWNDedicatedServer zip.
2. Refer to readme.linuxdedserver.txt included in the .zip for further instructions.
Mac:
1. Download and extract the NWNDedicatedServer zip.
2. Refer to readme.macserver.txt included in the .zip for further instructions.
Windows Dedicated Server Instructions
By: Craig Welburn and Andrew Gardner
Starting the Server
The dedicated server application is nwserver.exe located in the directory where you have installed Neverwinter Nights. Double click nwserver.exe to start the dedicated server.
There are a number of command-line options available when running NWServer if you start it from a command prompt or by creating a shortcut. Once NWServer is running, you may change most of these options in the dedicated server application.
Using Command-Line Options with a Shortcut:
Right-click on 'nwserver.exe' and select 'Create Shortcut'
This will create a 'Shortcut to nwserver.exe' file
Right-click on this shortcut and select 'Properties'
The 'Target' field of the shortcut will have the path to 'nwserver.exe', depending on where you installed Neverwinter Nights on your computer. With the default install, it should read:
"C: \NeverwinterNights \NWN \nwserver.exe"
Let's say I want to set my shortcut with the following options:
server name of "DragonWorld"
using port 5200
5 players max
players levels 3-8
I would edit the "Target" field to read:
"C: \NeverwinterNights \NWN \nwserver.exe" -servername DragonWorld -port 5200 -maxclients 5 -minlevel 3 -maxlevel 8
By running this shortcut, my server now starts with these options already set.
Command-Line Options
-module <name>
Loads and runs the specified module. The module name is the name without the extension of a module file from your 'nwm' or 'modules' directory
-load <slot#>
Loads and runs the specified saved game. Saved games are located in the saves directory of your installation
-maxclients #
Set the maximum number of connections to the game server
-minlevel #
Set the minimum character level required by the server
-maxlevel #
Set the maximum character level allowed by the server
-pauseandplay 0/1
0 = game can only be paused by DM, 1 = game can by paused by players
-pvp 0/1
0 = none, 1 = party, 2 = full
-servervault 0/1
0 = local characters only. 1 = server characters only
-elc 0/1
0 = don't enforce legal characters, 1 = do enforce legal characters
-ilr 0/1
0 = don't enforce item level restrictions, 1 = do enforce item level restrictions
-gametype #
Set which game room to post the game to (if game is posted to the Internet). The game room types available in the game at the time this was written were Action, Story, Story lite, Role Play, Team, Melee, Arena, Social, Alternative, PW Action, PW Story, Solo and Tech Support.
-oneparty 0/1
0 = allow multiple parties, 1 = allow only one party
-difficulty #
1 = easy, 2 = normal, 3 = D&D hardcore, 4 = very difficult
-autosaveinterval #
Set how frequently (in minutes) to autosave. 0 disables autosave
-playerpassword
Set the password required by players to join the game. If a player password is not set, players will be able to join without a password.
-dmpassword <password>
Set the password required by DMs to DM the game. If a DM password is not set, all DM access will be disabled.
-servername <name>
Set the name that this server will display in the mulitplayer game listing
-publicserver 0/1
0 = do not list server with the matching service. 1 = list server with the matching service
-reloadwhenempty 0/1
0 = module state is persistant as long as server is running, 1 = module state is reset when the server becomes empty (i.e. all players logout).
-port #
Specify the port to listen on for the server
Command line parameters override nwnplayer.ini settings which override hard coded defaults.
| Command
Line |
INI
Section / Setting |
Default |
| -maxclients |
Server Options / Max Players |
6 |
| -minlevel |
Server Options /
MinCharLevel |
1 |
| -maxlevel |
Server Options / MaxCharLevel |
20 |
| -pauseandplay |
Server Options /
PauseAndPlay |
0 |
| -pvp |
Server Options / PVP Setting |
1 |
| -servervault |
INVERSE OF
Server Options / AllowLocalChars |
0 |
| -elc |
Server Options / Enforce Legal Characters |
1 |
| -ilr |
Server Options /
ItemLevelRestrictions |
1 |
| -gametype |
Server Options / Game Type |
0 |
| -oneparty |
Server Options / One Party
Only |
1 |
| -difficulty |
Game Options / Difficulty Level |
2 |
| -autosaveinterval |
Server Options / Auto Save
Interval
Server Options / Disable AutoSave |
0
0 |
| -playerpassword |
Server Options / PlayerPassword |
none |
| -dmpassword |
Server Options / DMPassword |
disabled |
| -servername |
Server Options / Server Name |
"Server" |
| -publicserver |
Server Options / GameSpy
Enabled |
1 |
| -reloadwhenempty |
Server Options / Reload Module When Empty |
0 |
| -port |
Server Options / Game Port |
5121 |
Server Description
The text that appears under "Server Description" in Server Details when clients are browsing for games is read from the file ServerDesc.txt in the server's NWN directory. Create / edit this file before running the dedicated server to set this text.
Hosting Games on the Internet
To host a game on the Internet, you will need to allow clients to initiate connections on the port the server is using (5121 by default). You may need to configure your firewall and/or router to allow this. How you do this will depend on your particular network hardware and software although it likely involved Port Forwarding.
The IP address displayed in the server interface may be an internal network address that is different from the external address that others connect to your server as. This should not be a concern unless others are unable to connect to your server.
Further reading, particular related to ports for a server behind a router or firewall, quoted from the default NWN\docs\readme.txt file:
Firewall Information
--------------------
If you are trying to connect to a Neverwinter Nights server through a firewall, NAT, or router, here is some information for you to help you get connected. First, please read the manual that came with your firewall or router.
Neverwinter Nights uses UDP, not TCP for its connections.
If you think that your firewall is preventing you from connecting to the game servers, please make sure that the following ports are open:
Ports 5120 through 5300
If you are wanting to make sure that your NAT is set up to allow the game to play here are some details:
Outgoing packets:
Source port: 5120-5129
Destination port: 5121-5300
Incoming packets:
Source port: 5121-5300
Destination port: 5120-5129
On the Game Client side, you can select what port your client uses. Go to your nwnplayer.ini file in your NWN Client Beta install directory. Find the following section:
[Profile]
Client Port=5120
Change this number if you need to force Neverwinter Nights to connect as a client on a different port.
Gamespy
-------
If you want to get a server listing via GameSpy, you�ll need additional ports to be open: 6667, 80, 27900, 28900, 29900, 29901, 13139, 6500
|
Port Forwarding:
When the server is behind a firewall, a server administrator will likely need to forward data to the computer running the server software. This is done via a process called port forwarding. Data coming into the firewall is often blocked and simply dropped. If the firewall is set up with port forwarding for the server, it takes any information headed to port 5121 (the default NWN server port) and forwards it to the correct computer behind the firewall.
Each firewall is slightly different. You will likely need to do a search for "port forwarding" and the brand/edition of your firewall. You can also set up port forwarding for NWN to other ports, depending on what you have setup in the various Neverwinter Nights .ini files.
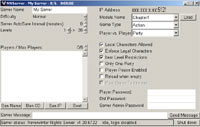
Using the Dedicated Server Interface
Double click on the nwserver.exe file in the folder that you installed Neverwinter Night to in order to launch the windows dedicated server.
You should first set all the options to the settings that you desire. Then select a module or saved game to load from the "Module Name" list and then click the "Load" button to load the module that you have selected.
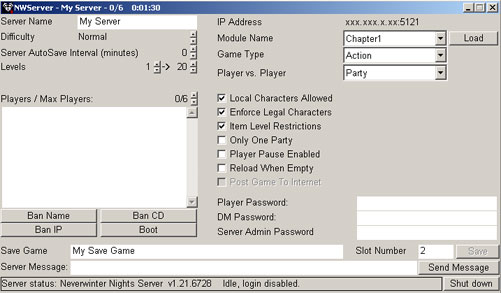
Server Name - Click in the white text box next to the label "Server Name" and type in a name for your server. This is the name of the server that others players will see when they look at the multiplayer game listing. While the text box is yellow, you are editing the server name. The new name that you choose wont take effect until the text box turns white again (which happens when you click on any other control on the Interface, or when you press the TAB key).
Difficulty - Click on the up arrow to increase the difficulty setting, click the down arrow to make the game easier.
Server AutoSave Interval (minutes) - When this is set to 0, autosaving is turned off. Otherwise the server will save the game periodically depending on the setting you choose (e.g. 5 = autosave every 5 minutes).
Levels - The left number indicates a lower level limit for characters trying to log in to your server. The level of all characters being brought onto the server must be equal to or greater than the value listed. The right number indicates the highest level limit for characters that attempt to log in to your server. Player's wont be able to take a character onto your server unless the character's level is equal to or less than the value that you set.
Players / Max Players - The left number indicates the number of players currently logged into your server. The right number indicates the maximum number of players that you will allow to login to your server at the same time. Decreasing this number below the number of players currently logged into your server will not remove any players from your server. However, if any players log out they wont be able to log back in again if the number of players is greater than or equal to the Max Players setting.
Player List - Below the Players / Max Players control there is a white box that will list all of the Player Names for the players currently logged into your game (this includes players that are logged into the server, but are still creating a character to play with).
IP Address - This displays the IP Address and the socket number that the server is using. The IP address displayed in the server interface may be an internal network address that is different from the external address that others connect to your server as. This should not be a concern unless others are unable to connect to your server.
Module Name - Click on the arrow next to the right of this label, this will bring up a list of available modules and saved games that you can load. Saved games will always appear at the bottom of the list. Once you have selected the module or saved game that you want to load, click the Load the button to load the module. The server status text near the bottom of the window will change to indicate that the module is loading.
Load Button - Loads the module, or save game that you have selected from the Module Name list. You must select a module to load before this button will become enabled.
Game Type - Click on the arrow on the Game Type control to display a list of the available game types. Select the type of game room that you want your server game to appear in from the available list using the mouse.
Player vs. Player - Click on the arrow on the Player vs. Player control to display a list of the available settings (i.e. None, Full, Party).
Local Characters Allowed - If this box is checked, then players will be allowed to bring characters into your game that they have saved on their own PC. If you leave this box unchecked then players will only be allowed to select characters from those available on the machine that the server is running on (or create a new character that will be saved on the same machine as the server). This setting must be set before you load a module and can not be changed after the module has been loaded.
Enforce Legal Characters - If this box is checked then all players that try to join your game will have their characters checked to make sure that they are valid characters. If it is determined that the player's character is not a legal character they will not be allowed to join the game with that character. They will have to choose another character or create a new one.
Item Level Restrictions - If this box is checked then Item Level Restrictions will be enforced in the game (Player will not be allowed to equip items that they don't have the required level for). If this box is left unchecked then Item Level Restrictions will not be enforced.
Only One Party - If this box is checked then all players will be in the same party when they join the game.
Player Pause Enabled - If this box is checked then players in the game can pause the game at any time. If this box is left unchecked then Players can not pause the game (although DMs still can).
Reload When Empty - If this box is checked then when the last player leaves the game, the server will reload the module/save game. Thus, any changes to the game will be lost when the are no longer any players logged in and the game state will be reset to the state the module was in when it was first loaded. If this box is left unchecked, then even if all players log out of the server the game will continue to run. If you then log back in again later any mosters you previously killed will remain dead and any items you dropped should still be where you left them. This option must be set before you load a module. It can not be changed after a module is loaded and running.
Post Game To Internet - This indicates whether or not your game is posted to the Internet. You can not change this setting after the server is running. You can turn this option on when you launch the server by using the command line argument -publicserver 1, or by setting it in your nwnplayer.ini file by setting "GameSpy Enabled=1".
Player Password - Click in the white text box next to the label "Player Password" and type in a password for your server. This is the password that other Players will be prompted for when attempting to connect to your server. While the text box is yellow, you are editing the player password. The new passord that you choose wont take effect until the text box turns white again (which happens when you click on any other control on the Interface, or when you press the TAB key). If you leave the player password blank, then any player can connect to you server and they will not be prompted to enter a password.
DM Password - Click in the white text box next to the label "DM Password" and type in a password for your server. This is the password that other DMs will be prompted for when attempting to connect to your server. While the text box is yellow, you are editing the DM password. The new passord that you choose wont take effect until the text box turns white again (which happens when you click on any other control on the Interface, or when you press the TAB key). If you leave the DM password blank, then no one will be able to join your game as a DM.
Server Admin Password - Reserved for future use, but is not used at this time.
Save Game - This is used for manually saving your server game (it is not used for autosaves). Type in a save name for your game here. You must also enter a slot number and click the save button before the game will be saved.
Slot Number - This indicates the save folder number that you want to manually save your game into. Save slots can be from 1 to 6 digits in length (do not use slot '0' or '1'). You can choose a slot number of a slot that already has a game saved in it and your new save will overwrite the old saved game.
Save Button - Clicking this button will save the game in the slot number you specified and with the saved named you specified.
Server Message - Type a message into the text box and click the "Send Message" button. The text that you typed will show up on the in game text panel as a grey text message for all players. You can use server messages to warn players when you are about to do things like restarting the server.
Shut Down Button - Clicking on this button will close down the server.
Server Status - This indicates the version number of the server that you are running and also displays the status of the server.
Idle - indicates that the server currently isn't doing any thing and no module is loaded.
Loading - Indicates that a module is currently being loaded.
Running, login at will - Inidcates that the module has finished loading and the game is now running. Players can now enter the game.
Banning Players
If there is a player logged into your game that you never want to play with ever again because they are being a jerk or are ruining your game experience, then you can ban that player from ever joining your game again. To do this click on the players "Player Name" in the player list described above and then click on one (or more) of the available "Ban" buttons. You can then also remove the player from the game immediately by clicking on the "Boot" button. If you ban a player from your server, the next time that the player tries to log into your server they will receive a message that states "You have been banned" and they wont be able to log in.
Ban Name - This will ban the selected player from your game by banning their "Player Name". If the banned player decides to create a new "Player Name" using their account, then the will be able to join your server using their new Player Name, but not the old name that you banned.
Ban CD - This will ban the selected player from your game by banning their CD-Key. So even if the player creates a new "Player Name" using their account they still wont be able to log into your game if you ban them by this method. If the banned player has more than one copy of the game, then they could use their other CD-Key and log back into your game.
Ban IP - This will ban the selected player's IP Address. No players that share this IP Address will be able to log back into your game. It is possible for more than one person to use the same IP Address, so banning the player's IP Address may also ban other players from playing in your game as well. It is also possible for a player to have more than one IP Address, so if they are using another IP Address they will still be able to log into your game (of course you can then ban that IP Address too).
Boot - This will immediately remove the selected player from your game. They will receive a message stating "You have been booted".
Unbanning Players
If you ban a player by mistake, you can unban them by editing your nwnplayer.ini file.
After shutting down the server, open the nwnplayer.ini file in notepad. Look for the headings "[Banned Ips]", "[Banned Players]" and "[Banned CD Keys]". The players that you have banned will be listed under these headings. Remove the entries for the player that you want to unban from the nwnplayer.ini (and renumber the entries properly) then save the changes. Then the next time that you launch your server the player will be able to log in again. You will have to renumber the ban entries so that they follow a proper sequence.
e.g. to unban Dups you would change the following text:
[Banned Players]
0=Craig Welburn
1=Dups
2=Andrew Gardner
to
[Banned Players]
0=Craig Welburn
1=Andrew Gardner
|
|